Friday, November 16, 2007

Journals


I found some cheap canvas journals that I decided to decorate.

I inked the canvas, in this case with Night of Navy. I used On Board Ginormous Pieces chipboard which I inked with Craft White, Craft Rose Red, and Classic Night of Navy.

I Modge Podged to seal it all, and have a patriotic journal!

I was inspired by some scrapbook pages I was working on for my Navy son.

Sunday, November 4, 2007

Autumn boxes


One of the projects we have been working on are Gift Boxes.
I stamped these boxes using a Spectrum Pad with my favorite Earth Element colors. I also used some old leaf stamp sets. The left box was stamped with the spectrum pad. The right was brayered and stamped and embossed with Winter White.
I used cello bags to make a window to view the goodies we will put inside. Its hard to see, but the StazOn white makes a neat touch on the window.
I hope my son's teacher likes it!

Fixing scrapbook pages


OK, you probably wonder what's up now.
Well, I am working on several projects that are taking some time. I like to give my Modge Podge
a chance to dry before I put on the next coat. So, I will be sharing those shortly.
One other thing I have been doing was going through some incomplete scrapbook pages to complete them. I found that several of the pages needed a letter or two. In many cases, I had used die-cuts to make letters, but between cutting them out and adhering them on, some get lost.
I was able to fix a few pages, but I had a big problem with one. I used die-cuts from a local scrapbook store, which closed their workroom. Yikes! What was I to do?
Well, I tried to take off the letters that were on, and messed up the entire bottom layer of paper.
Now, its worse!
Luckily, this was done with SU cardstock. I decided to just cover the whole bottom with same brown paper I used a year or so ago when I started the page. I just grabbed a new sheet and it matched perfectly!
Although I love all the variety of patterned papers in the stores, I am frequently frustrated by the constant changing of products. I find I can never go back and get more, and if I do, the color doesn't always match. Several years of SU paper, and the color lot is still the same. Ya ho!

Sunday, September 16, 2007

Too much "Coffee" & too much stuff

Well, I did manage to get a couple of things done around the bird. I covered a couple of more of my scrappin' tins.
I love those International Coffees (especially now that they are sugar-free) I love the taste and I love the tins. Those tins are great for storing just about anything. In the past, I have stored memerobilia and small glass objects in them. Now, I store all my little scrapping materials. I did a workshop on shakerboxes. I put all the demo shaker boxes in a tin. When I cut or stamp letters, I always make extras and I store those in a tin. Same when I dye ribbon, flowers or make other accessories like polyshrink or polymer clays. I make extra and place it all in the tins. This provides me with some instant customized accessories and examples to share.
Part of the great thing about the tins is how well they stack! And by making them different with Stampin' Up Designer papers, I can tell which tin I want. Sometimes, I add stickers from our accessories kits to label the tins.
Of course, there are other tins laying around as well. This tin was part of a present from my secret pal. After all the goodies were gone, I thought about throwing it away. But it was such a cute size for little gifts. The outside was a bit unsightly though. So I used our new Porcelain Print paper (Its like the old Recollections but in blues) Pretty!

I am also using the Porcelain Prints to cover some boxes for a friend. I'll be able to finish the decoupage when the source of feathers are out of the area.

Guest Slowing me down

Well, you would think that having my Craft Room back, I would have lots to show for it.

Not quite. We have a "guest" staying in that room. He has been here for a couple of weeks while his family is in Italy. Its hard to work with him around because he makes such a mess at times and he is a bit odoriferous. Plus, its a bit unnerving to be continually watched, especially when his head is upside down.

It also doesn't help that we have gone back to work and I spend much of my weekend grading papers and writing lessons.

Sunday, September 2, 2007

My Craft Room!

Oh Yeah!!
I have a place to work again. After my Number 1 son left for bootcamp, we started the household shuffle. Number 2 son went into his old room and all my craft stuff was moved into Number 2 son's room. That room was originally my craft room before he was born. Unfortunately, our house is not big enough for both boys and my hobbies. Most my stuff is finally returned to its proper location, to my husband's relief. We did leave a bed set up in there, so it is a tight work area. But its bigger than what I had before.
Now its time to get some projects done!

Sunday, August 12, 2007

Scrappin' Circle

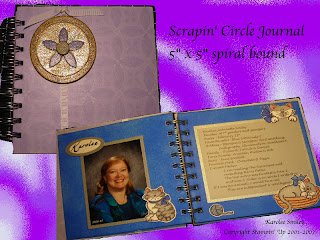
Well, one of the things that I started before the chaos is our Scrappin' Circle Journal.

I decorated a 5x5 chipboard journal with Almost Amethyst Prints Designer Paper and some On Board Chipboard (colored with gold, saffron and amethyst inks)

Inside, each of us signs in and creates two pages: Love Me, Love My Stampin'. The first spread is about "me". Each tells a little about themselves. The second spread is about "my stampin'". Each person tells about their favorite techniques and products.
So here is me. I just need to wait as each person takes it over a different month to tell about themselves.

So where have I been?


You might be are wondering why it has been so quiet here. Well, that's because it hasn't been quiet around our house.
We have been preparing for the departure of number 1 son for Navy bootcamp. Part of preparing for him to leave was packing up and organizing his stuff. So, his boxes of stuff are everywhere. Of course, now that he is packed, we are moving stuff around, including getting the stamping stuff out of my bedroom. There is still quite a bit of cleaning and moving to do, but my productivity will increase when I have some space to work.

I lost my craft room 10 years ago when his little brother was born. So, even though I miss my son, I am gaining a stamp room!

Monday, July 30, 2007

Triangle Trifold Card

This is another fabulous project that some of the other Stampin' Up group members came up with.
This Triangle Trifold card uses the new tapestry theme line: the new Baroque Designer Paper and Baroque Motifs stamp set.
This card is very versatile. You can opt to attach the ribbon in a variety of ways. It can be attached to the front (one triangle) or the back. The key is, don't attach it in too many places, or the card will not open. I like using the Sticky Strip, since it will hold even if you only are attaching a small area.
There is a great tutorial for this on Split Coast Stampers at:
http://www.splitcoaststampers.com/resources/triangletrifold.php

Wednesday, July 25, 2007

Luv2Stamp Cards


One of the great things about being a Stampin' Up demonstrator is the access to workshops and trainings. Here are some of the great cards my fellow demonstrators designed and helped up to make.
1st card- This card uses the Pick a Petal stamp set. The green leaf was stamped separately and cut out, as was the yellow center. The big trick in stamping the petals is starting with 12 and 6 o'clock. Then put in the 3. The last two can fill in the spaces. A great way to balance out your petals. The slit punch makes a closure to the card.
2nd card- This card uses the Flowers and Flourishes set. Although difficult to see in the photo, the white is a folded envelope that opens with a pocket. The tab showing out of the top is from a tag in the envelope pocket. The envelope is held closed by a ribbon through a slit that is tied. A very clever card!
3rd card- This card uses the Double-Line Doodles set. Markers are used to color the images. Use different shades, like on the green leaves, to add interest. Highlighting a word in the text draws the eye to important terms, like the red "love". And notice the great brads! The new Circle Rhinestone Brads add a sparkle for the center and the Bold Bright Brads add a coordinating color to the tag. Tip: The Rhinestone Brads tend to raise up. To have them lay flat, use the pad of the Crafters Tool Kit to protect the rhinestone, gently hammer on the brad.

Wednesday, July 4, 2007

My Swap

At my last Stampin' Up meeting, we had a card swap for cards using the new catalog.

One of my favorite new sets is the Baroque Motifs. I used Old Olive cardstock and sponged it with Old Olive ink to "age" it. I used gold embossing powder with versamark to emboss the background image on the Old Olive and the medallion on Basic Black.

I highlighted it with Black grosgrain ribbon and raised the medallion with Stampin' Dimensionals.
This is all mounted on Basic Black cardstock.

Notebooks

I love the chipboard books. What a great way to customize a journal.

I made this one by covering the chipboard with Designer Paper and using Modge Podge to seal it and protect it from wear and tear.
Since I made this before the spiral punch came out, I had to punch out the holes for the spiral binding very carefully with the awl from the Crafters Tool Kit. I wrapped the coordinating organdy ribbon and gold cord aroung the front cover. The Hodge Podge Hardware holds "Mon Ami" covered with the Cracked Glass technique to give it that vintage look. (Glassy Glaze is embossed several times, cooled and cracked)

Lunch boxes


One of my favorite projects is decorating Lunch Tins.

I love using these tins for all kinds of things. They make great recipe tins. I have one for holding my sewing supplies (Hence, the heirlooms paper with sewing supplies) They are the perfect size for holding card swaps or organizing your cards. And they make fun gifts, especially when filled with goodies like chocolate!

Some people use sticky strip to hold the paper and accessories down.
I like to add a protective layer to the paper by applying Modge Podge. By using a decoupage medium, the decorative paper is protected from water or other minor damaging factors. I feel this is especially important for tins that are used a recipe boxes. I have had SO many paper products damaged in the kitchen!

Sticky strip is very strong so it makes a great way to adhere ribbon and embellishments. I add sticky strip to the entire length of the ribbon. This ensures that the ribbon will stay in place, even after a large amount of use.

Hodge Podge hardware is used to hold personalized quotes. Glassy Glaze is embossed in several layers, cooled and cracked to create the "Cracked Glass" style of covering. This gives it that vintage look.

Paper-wise, the Designer Papers are fabulous! They color coordinate with the ribbons and stamps. They are light enough to be flexible but the double-sided papers are thick enough to have some strength and accidental reduce tearing.

There are a variety of fun ribbons you can use to decorate. I like to coordinate a couple of different colors of grosgrain and gingham ribbons. I like ribbon on the edges and I just put a few on each side of the handle. I personally like to be able to use the handle without ribbons in the way. Many people like to make it more decorative and add even more. The choice is yours!

I can't wait to make some new ones with our new designer papers!

Monday, July 2, 2007

Welcome!

Well, its a new Stampin' year and my resolution is to improve my online sharing!

In the past, I have had the chance to share ideas at workshops and I have been sharing at our monthly scrapbook club. Its fun, but I wish I could interact creatively more often.

I have access to so many great resources, I just love to share! I attend my Stampin' Up group meetings where other Stampin' Up demonstrators share great ideas and techniques. I read a variety of Stampin' magazines and websites that provide directions for some fun projects. I now I can share my take on them!

With each project I do, I'll be sure to share what supplies I use and the techniques.
Feel free to email me with any questions and let me know if there is anything I was not clear on. I hope you find this useful, but I am always open to more one-on-one sharing. If you are local, you can join our Stampin' circle, or even start your own!
toodles